Tuesday, December 29, 2020

CISA Sparrow - Looking for Indicators of Compromise in Azure/M365

Overview

The US Cybersecurity and Infrastructure Security Agency (CISA) gave Azure/M365 admins a late December present. GitHub - cisagov/Sparrow.  The purpose is to look for known Advanced Persistent Threat indicators in Azure/Microsoft 365.

Here is a bit of background looking at what the script does and does not do.  I will leave out analysis of the code used, as they may evolve.  Please look at the source on GitHub. 

Sparrow.ps1 looks primarily at AzureAD Service Principals of type: Application and MS Graph and at the Unified Audit Log.

If you have a suspect Azure AppID, and you have M365 E5/G5 (or a plan that tracks the MailItemsAccessed operation in the Unified Audit Log) this AppID can be supplied, and an export of the mail items accessed by the suspect AppID will be logged as an operation within this script.

What is this script checking?

Sparrow.ps1 is looking for the top 5000 results in the following areas of the Unified Audit Log (UAL):

VERBOSE: Searching for 'Set domain authentication' and 'Set federation settings on domain' operations in the UAL.
VERBOSE: Searching for 'Update application' and 'Update application ? Certificates and secrets management' in the UAL.
VERBOSE: Searching for 'Update service principal' and 'Add service principal credentials' in the UAL.
VERBOSE: Searching for 'Add app role assignment to service principal', 'Add app role assignment grant to user', and
'Add app role assignment to group' in the UAL.
VERBOSE: Searching for 'Add OAuth2PermissionGrant' and 'Consent to application' in the UAL.
VERBOSE: Searching for 16457 in UserLoggedIn and UserLoginFailed operations in the UAL.
VERBOSE: Searching for PowerShell logins into mailboxes in the UAL.
VERBOSE: Searching for PowerShell logins using known PS application ids in the UAL.


What is Sparrow.ps1 NOT checking?

Sparrow is not looking at your tenant configuration or Exchange Client Access configuration.  Nor is it making any analysis of your Allow/Block Lists in Exchange Online Protection.  Recommend a few links on these areas: 


Mailbox audit logging is enabled by default for mailboxes as of Janurary 2019.  You may need to enable it per mailbox for older mailboxes. Manage mailbox auditing - Microsoft 365 Compliance | Microsoft Docs


Reviewing Sparrow Output

Depending on the size of your tenant, the top 5000 results is going to generate a LOT of info to comb through.  I am not a CyberSecurity guy, so I am not going to attempt to rank these Indicators of Compromise by severity.  Suffice to say that some of these are standard operations in AzureAD and are of lesser concern.

Wednesday, August 19, 2020

EVE Echoes Fleet Operations

  1. Creating a Fleet
  2. Adding players
    1. Inviting Others
    2. Join a Fleet
    3. Select a Commander
    4. Deputies
  3. Encounters and Bounties
  4. Assigning Commands
  5. Setting Fleet Actions

1. Create a Fleet 


From the Main Menu, tap the Fleet icon at the bottom.  Tap Create Fleet.  Invite seems to only work Locally or Regionally.  Friends and Corporate filters do nothing (for me, at the time of this writing).


Alternatively, create a fleet in an ad-hoc basis by tapping on another player and getting into their Contact Card.  Select Team Up option to instantly create a fleet with someone.


2. Adding Players


Inviting others:

I think the best way is to tap on a player from chat or contacts, and Team Up with them.  If they're already in another Fleet, this will fail and give you a message.  If not, they will receive a fleet invite notification on-screen.

Join a Fleet:

From the Fleet screen, there is a Find feature.  Go find some randos.

Select a Commander:

If you haven't gained familiarity with Fleet Operations, then you can assign another member as Commander and make them do all the work.

Deputies:

I don't have a firm handle on what roles and permissions come with being a Deputy.  Needs more info and testing.  I think they can set Commands but not Fleet Actions.

3. Encounters and Bounties:

Encounters are a good way to get specific tier missions with dedicated Cosmic Anomalies (not publicly accessible).  As long as the bounties are shared by all fleet members (seems this is currently bugged), decent profits are to be had by all.  Regular Cosmic Anomalies in systems are also good to attack as a group (and definitely keep an eye out for Scout and Inquisitor Anomalies!).  

4.Assigning Commands:


Commands are available in the left-hand menu that appears when you are in a Fleet, regardless of your position within the fleet.  

Fleet Commands (left)

Two Locate Commands: 

Located Here - Sends a ping to members.  If they accept, they will travel to the location broadcast.
Stand by - I dunno.  Haven't used it yet. 

Two Help Commands:

Repair Required 
Capacitor Required 

5.Setting Fleet Actions:


A Fleet Commander gets extra Fleet Command actions when tapping on locations in the Navigation menu (the right-side menu where you toggle between Ships/Mining/Stations, etc.)  This is the good stuff.  This is what makes a fleet a cohesive group.  

DO: Use Fleet Commands to move as a group.
DON'T: Spam Locate Here commands to get people to try to catch up.

Tips:

Movement Between Systems

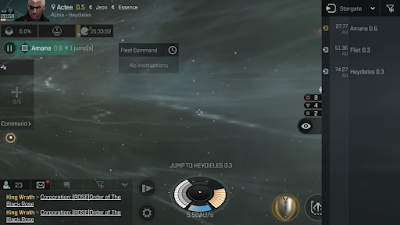
For a multi-jump route, Fleet Commander should plot it out on Autopilot, but do not engage.  With the course plotted, Stargates turn yellow as they are on the route.  

Route Set - Gate Highlighted


Move to systems in a route:
Find the next Stargate on your route. Tap it.
Tap Fleet Command.
Tap Jump Fleet.

Your Fleet will now perform a coordinated jump to the next system.  Repeat this for a multi-hop route.


Coordinating Movements In-System

Now that we can get across systems, what do we do when we get there?

Similar to Jump Fleet, you can Warp Fleet to points of interest in the Navigation Menu.  This will very helpfully drop fleet members into an Anomaly or Mining instance at the same time.

Warp Fleet

Friday, July 17, 2020

Skype for Business Online sessions now available through Teams PowerShell Module

The June 2020 preview (but generally available) update to the Microsoft Teams powershell module allows creation of SFB Online sessions, without the Windows-specific binaries.  Short version: no more SFB Online Module install requirements, and now the session is available cross-platform!

First, it is recommended to remove any prior versions of the MicrosoftTeams module, as well as SFB Online if you had it.  This article will use Azure Cloud Shell, which works in a web browser.

Azure Shell: Clean up installed modules.


Normally available via https://shell.azure.com, or by clicking the Cloud Shell button in the title bar of https://portal.azure.com.

Remove all instances of the MS Teams module, we will need a specific public preview release to get going with SFBO sessions.  (Not needed if you are starting from scratch with no prior SFBO/Teams modules)

Uninstall-Module MicrosoftTeams -AllVersions -Force


Get current Teams module installed


Install June 2020 Preview release of Microsoft Teams module from https://www.powershellgallery.com/api/v2 (this is a default source if PSGet is installed)

Install-Module MicrosoftTeams -RequiredVersion 1.1.3-Preview -AllowPrerelease 

Import-Module MicrosoftTeams

Create a session for SFBO and then connect to it


$sfbsession = New-CsOnlineSession

Cloud Shell/Mac/other non-Windows: This login will prompt the "device based login" Modern Authentication experience:


Import-PSSession $sfbsession -AllowClobber


Tada - we have a SFBOnline session, with the expected cmdlets available and functioning: 

Friday, May 22, 2020

X4: Foundations Boarding (3.20 Beta)

Boarding in X4 is a bit of an arcane subject.  Start with the basics.


  • Target shields will not affect boarding.  (They had to be under 5% in X3 otherwise marines died on the hull.)
  • Surface Elements (engines and turrets in particular) contribute to Target Combat Effectiveness, which is the deciding factor when configuring the Approach phase of boarding.
  • DO remove turrets and engines.  Target will attempt to repair, dispatch any repair or defense drones, as well as lasertowers or other hostiles.
  • DO practice on pirates in otherwise friendly territory.  I have not graduated to "hot" boarding ops in unfriendly sectors.  (I did take a PAR Odysseus in ZYA space, with a decent reputation hit.)
  • Hull strength can be 100%, but this directly contributes to how much time the Infiltration phase takes.  80% seems to be a good point for quicker breach.


Preparation


Attacking ship - Small and fast with a punch is a good mix.  I like any fighter with Plasma cannons, or an M- class with decent frontal weaponry.  Small and fast is good for avoiding big ship defenses.  Plasma packs a punch to get rid of surface elements.

Target Selection - I like the Split Rattlesnake Destroyer (L), and 92 marines are cheaper than shipyard prices.  Plus, there is a Pirate-ish faction that flies the Rattlesnake, Fallen Families (FAF).  These are military ships and tend to have a complement of decent-skilled Marines.  It will be a meat grinder.

Scan your target - This will show you the makeup of the crew, and total number of crew on the ship.  Service crew are squishy and don't contribute much defense.  Marines will be much stronger resistance.

Marine Prep - Assemble a large squad of marines.  You will need some good ones, and a lot of Recruits, but plan on sending the max capacity of the target.  Fast ships are NOT necessary, as long as you can completely disable your target.

Disable Target - I go for engines first.  Engines are normally in a defensive blind spot.  Start there, and move on to Turrets.  I tend to leave Shield modules intact unless they are preventing me from taking out turrets.

Marine Approach - Order your ships carrying marines to close in on the target.  DO NOT assign the Board order from long distance.  Ships will close distance by Boosting, which is just dumb.  Fly To orders will use Travel Drive.  Do both!  Set Fly To orders, then Board orders directly afterward.

Keep Target Disabled - Prolonged attacks are not necessary.  The target will very slowly attempt to repair engines for escape, and may drop defense drones, lasertowers, and repair drones to avoid your attack.

Once all pods have arrived at the target ship, the operation goes into the Infiltration phase (cutting through the hull).  Screenshot:


Here I had a number of ships selected in a single Board command, so they are all on the roster.  Each one had a different makeup of Marines.  Upon scanning my target, I found it had 25 Marines (2-3.5 stars each) and 30 crew.  My marines didn't even get to 2 stars, but I was bringing 83 Veterans and 9 Recruits to the party. The Target ship has a strong defense value, but I'm coming at the operation with about 1.5x the strength.  2.0x would be preferred, but this target was encroaching on my territory and I didn't want to have any fallout with my traders.

Last tip for operation setup: I tell all participating ships to Maintain Distance.  I don't want these Rattlesnakes lighting up my boarding operation.  I can keep engines and turrets disabled with my fighter.

When setting up the Boarding op, the default value for "Launch Pods at Combat Effectiveness" is "Weak".  I don't even order the Boarding op until all turrets are destroyed, which leaves a target at Very Weak.  Default for "Start Breaching at  Hull Strength is "Strong".  I don't know what percentage that is, but this target is already at 75% hull.  The phase would start once all pods have made contact anyway.

Approach Phase is mostly covered above.  Disable the target and select your marines to be deployed.

Infiltration Phase - Hull % directly affects how fast your marines will make it through.  There is no separate Marine Skill for this like in X3.  I don't know if there is anything like Morale effect, but at 75% the marines are through in a minute or two.

Assault Phase -  Here is a RNG-based go around, mostly determined by the Boarding Attack Strength and Boarding Resistance values shown on the screen.

Assault Analysis


I've setup a scenario which is repeatable and safe to do some analysis on the RNG and Boarding Strength variables.

First off, there's a save file.  https://drive.google.com/file/d/1t8Wz6WO7-rCXfNYHpqplulRyhZqGm9Z3/view?usp=sharing

I have run 10 operations with the same config (the save point is after the Approach phase, and in the middle of Infiltration).

Assault Stats:

Target: FAF Rattlesnake (Capacity: 92)
25 Veteran Marines
30 Crew

Attackers
83 Veteran Marines
9 Recruit Marines


Attempt 1: Success!
Survivors: 25 Veterans, 2 Recruits

Attempt 2: Success!
Survivors: 30 Veterans, 2 Recruits

Attempt 3: Success!
Survivors: 23 Veterans, 0 Recruits

Attempt 4: Success!
Survivors: 26 Veterans, 0 Recruits

Attempt 5: Success!
Survivors: 21 Veterans, 1 Recruit

Attempt 6: Success!
Survivors: 24 Veterans, 2 Recruits

Attempt 7: Success!
Survivors: 25 Veterans, 0 Recruits

Attempt 8: Success!
Survivors: 20 Veterans, 3 Recruits

Attempt 9: Success!
Survivors: 26 Veterans, 7 Recruits

Attempt 10: Success!
Survivors: 21 Veterans, 1 Recruit

Thursday, September 6, 2018

Installing RSAT Components on Windows 10 1809 (Redstone 5) and above

Helpfully, Microsoft has made unavailable cmdlets like those contained in the ActiveDirectory module for the 1809 build of Windows 10.  It seems these become unavailable after every Insider update.

For those of you who had a rough morning so far, here you go.

Reference:

https://docs.microsoft.com/en-us/windows-insider/at-home/whats-new-wip-at-home#rsat-is-now-available-on-demand

Now, how do you get these back?

We now have the *-WindowsCapability cmdlets available to manage these items.  These seem to correspond directly to the Settings App controls referenced in the article above.  However, I have personally had no success getting them to work:

PS C:\WINDOWS\system32> Add-WindowsCapability -Online -Name "Rsat.ActiveDirectory.DS-LDS.Tools~~~~0.0.1.0"
Add-WindowsCapability : Add-WindowsCapability failed. Error code = 0x800f0954

Instead, I've been using the classic RSAT installer MSU:

https://www.microsoft.com/en-us/download/details.aspx?id=45520

Once the latest flavor of the RSAT tools are installed via the MSU here, I'm able to Import-Module ActiveDirectory just fine and get ADUC back.

I'm still working on isolating whether this is an issue with where I get updates by default (not Microsoft directly), or whether it's because I had RSAT installed in the "old" way prior to getting to Redstone 5.

Either way, this has become a pain in the butt.

Thursday, July 6, 2017

Restricting Auto-Forwarding

Office 365 Messaging – Automatic Forwarding of Emails

Purpose
Outline scenarios involving auto-forwarding email messages and providing controls to maintain security compliance. Securing message traffic through the use of transport and other rules that can circumvent the ability to audit and track messaging.

Scenarios
Users have the ability to enable “Automatic Forwarding” of all messages. There are two general methods that allow forwarding:
Ø  OWA - Enable Automatic Forwarding of all Emails (with the option to enable keeping a copy in the users’ mailbox).
Ø  Creating and enabling a rule that would forward all messages to another messaging application (i.e. Yahoo!, Gmail, etc.) after the message arrived within the users’ mailbox.
Managing destination domains with transport rules, preventing the forwarding of *any* messages to these domains, or the blocking of *ALL* auto-forwarded messages with exceptions based on group membership.

(1) Outlook Web Access (OWA) Auto-Forward
OWA has a feature that enables the forwarding of all messages that are destined for delivery to a users’ mailbox without delivering it to the mail store where that user’s mailbox lives thereby bypassing legal auditing and compliance.  The user does have the option to enable the feature which creates a copy of the forwarded message (a check box).
This risk can be mitigated by creating and applying a policy that removes this feature, and then a script created to programmatically remove any existing destination addresses currently configured for each user.
EXAMPLE:
User John Doe has a mailbox and has configured OWA to automatically forward all of his mail to Gmail.  The user has a device already configured to organize and sort mail using Gmail and does not have one configured for accessing messaging through O365 (OWA/Outlook/EWS/ActiveSync).  The user may have a legitimate business use for forwarding messages outside of the company to other addresses (Partner Resources, Purchasing, etc.); however, because this user does not have the checkbox selected to keep a copy in their O365 mailbox, there is no way for our tools to audit and track messaging information for this users’ mailbox (except for the configured destination address that all messages are being forwarded to).
To prevent this user from using the ‘Auto Forward Email’ feature of OWA, we have a policy that removes that as an option for OWA mailboxes.

(2) Creating and Using Rules to Auto-Forward
Outlook desktop client and OWA have the ability to create and enable “rules” which take effect after a message arrives WITHIN the users’ mailbox. A user can create a rule that automatically forwards all messages to another location, but because of how rules work, the message gets delivered to the information store and then gets forwarded to the destination set in the rule.  This allows for auditing and compliance tools to be used.
EXAMPLE:
Jane Smith has a rule in her Outlook client that automatically forwards a copy of every message she gets to an external email address. Because of how rules work, all messaging information is retained within the mailbox that can be audited and tracked for compliance.
Rules cannot be easily managed by policy or programmatically making any controls to manage rules in Outlook difficult/costly.

(3) Using Transport Rules
We can create transport rules that will explicitly prevent the delivery of ANY messages to a destination domain (i.e. Yahoo.com, google.com, aol.com, etc.) or based on the type of message (in this case, Auto-Forwarded messages), block delivery.  A transport rule is applied during transit and can include response messages notifying users of the policy that is blocking auto-forwarding.
EXAMPLE:
Create a transport rule that blocks all auto-forwarded messages (configured through OWA, where the message does not get delivered to the mailbox by default when Auto-Forwarding is enabled).
Create New Rule with conditions:
-          The sender is located “Inside the organization”
-          The recipient is located “Outside the organization”
-          The message type is “Auto-Forward”
-          Action <define_action>
-          Exception:  The sender is a member of this group <define_exception_group>
Using this method, it would be advised to still run the scripts to remove the ability to configure “Auto-Forwarding” through OWA and clear the attributes users already have configured.  This would be a secondary layer to ensuring auto-forwarded messages are managed.

Recommendation:

We can move forward by implementing scenarios 1 and 3.  Client side rules (#2) would be difficult and costly to implement.

Implementation:

Disable Autoforward for Users

Testaag sample:
1.       Create a new Management Role which will restrict the following Set-Mailbox abilities for end users.
a.       DeliverToMailboxAndForward
b.       ForwardingAddress
c.       ForwardingSmtpAddress
2.       With these de-scoped from a user’s Access Control Entry, they will no longer be available in OWA.
3.       Make the new custom Management Role the default in the Default Role Assignment Policy.
PS > New-ManagementRole -Name "MyBaseOptions-noforward_TAAG" -Parent MyBaseOptions

Name                                                        RoleType
----                                                        --------
MyBaseOptions-noforward_TAAG                                MyBaseOptions

PS > Set-ManagementRoleEntry mybaseoptions-noforward_taag\Set-Mailbox -RemoveParameter -Parameters DelivertoMailboxandForward,ForwardingAddress,ForwardingSmtpAddress


End result:
PS > Get-ManagementRoleAssignment -RoleAssignee "Default Role Assignment Policy" | FT Name,Role -AutoSize

Name                                                         Role
----                                                         ----
MyRetentionPolicies-Default Role Assignment Policy           MyRetentionPolicies
MyProfileInformation-Default Role Assignment Policy          MyProfileInformation
MyTextMessaging-Default Role Assignment Policy               MyTextMessaging
MyMailSubscriptions-Default Role Assignment Policy           MyMailSubscriptions
MyVoiceMail-Default Role Assignment Policy                   MyVoiceMail
MyContactInformation-Default Role Assignment Policy          MyContactInformation
MyTeamMailboxes-Default Role Assignment Policy               MyTeamMailboxes
My Marketplace Apps-Default Role Assignment Policy           My Marketplace Apps
MyDistributionGroups-Default Role Assignment Policy          MyDistributionGroups
MyDistributionGroupMembership-Default Role Assignment Policy MyDistributionGroupMembership
My ReadWriteMailbox Apps-Default Role Assignment Policy      My ReadWriteMailbox Apps
My Custom Apps-Default Role Assignment Policy                My Custom Apps
MyBaseOptions-noforward_TAAG-Default Role Assignment Policy  MyBaseOptions-noforward_TAAG


Note that the default MyBaseOptions role ACE is missing from the list entirely, and the substitute “no forward” policy is in its place.


Enable auditing of autoforward in Exchange Transport for compliance


Exception scenarios:

Define exception group for reporting of autoforward instances.  

Keep Default Role Assignment Policy flat for everyone.  Exception users can submit Service Requests to the Exchange team


Wednesday, December 16, 2015

Office 365 DKIM Going Live

DKIM signing for outbound messages has been available (with some issues) in Office 365 for a couple of months now.  It is now beginning to roll out into standard release tenants in production, and this post will attempt to break down what this means.

For those who are Office 365 (Exchange Online) Admins, and aren't familiar with SPF, DKIM and DMARC, I recommend referencing Terry Zink's blog.  In my view, this is the best practice.

DKIM Goes Online

Exchange admins can check the current status of DKIM in their tenant through the Get-DkimSigningConfig cmdlet.  Note that if any results return, then keys have been setup for the listed domain(s).  It will return blank if nothing has been setup in a tenant.

In my experience, the primary sending domain tenant.onmicrosoft.com is now set to Enabled.  The other domains in my tenant were configured with key pairs generated, but the domains were not yet enabled because CNAMEs were not found in DNS.

The result is that all messages coming from my O365 domain are now signed with DKIM!  My test tenant as well as Gmail give me a Pass for DKIM evaluation, even though the envelope.from domain (vanity domain) is not yet enabled.

Issues

I have not yet seen any issues, but there is word that some automatic replies such as OOF messages can fail DKIM evaluation by some services.  As I understand it, this is being worked on.